
Here you will discover a helpful breakdown to taking high-quality photos using your smartphone. Whether you’re new to photography or looking to refine your skills, these step-by-step instructions and practical tips will help you capture stunning images of your charcuterie boards. Let’s dive in!
Step-by-Step Guide to Taking High-Quality Photos
- Clean Your Lens:
- Why: Dust and smudges on your lens can make your photos look blurry or hazy.
- How: Use a soft, lint-free cloth to gently clean the lens before you start shooting.
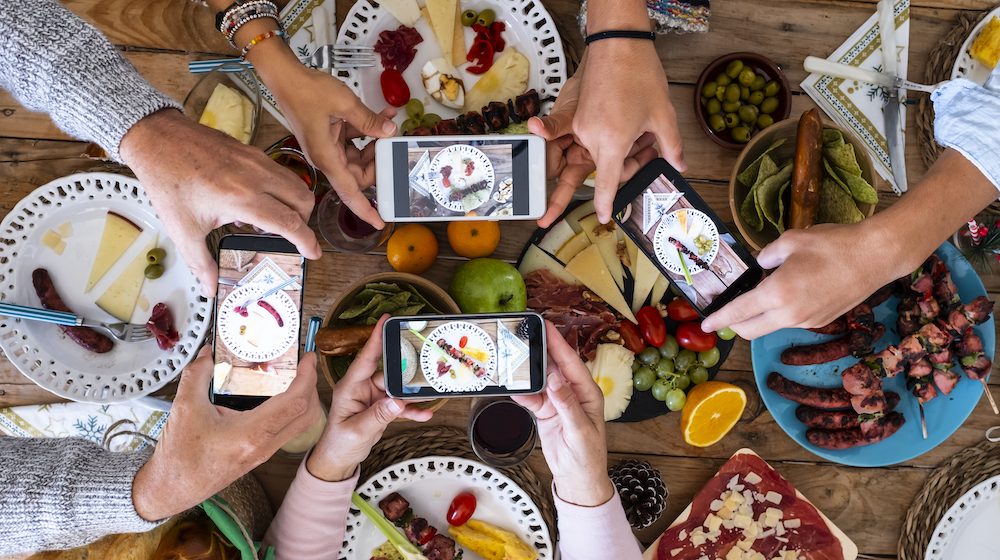
- Set Up Your Shot:
- Why: A well-prepared setup ensures your photo captures all the details you want to highlight.
- How: Arrange your charcuterie board in a well-lit area, ensuring that all elements are neatly placed and visually appealing.
- Enable Grid Lines:
- Why: Grid lines help you apply the rule of thirds, making your composition more balanced and interesting.
- How: Enable the grid lines in your camera settings. Align key elements of your charcuterie board along the lines or at the intersections.
- Focus and Exposure:
- Why: Proper focus and exposure ensure that your main subject is sharp and well-lit.
- How: Tap on the screen where you want the camera to focus. Adjust the exposure if necessary by sliding your finger up or down on the screen.
- Hold Steady:
- Why: A steady hand prevents blurry photos.
- How: Use both hands to hold your phone or stabilize it with a tripod. Take a deep breath and hold it while you press the shutter button.
Practical Tips for Lighting, Composition, and Angles
Lighting:
- Natural Light is Best:
- Why: Natural light is soft and flattering, reducing harsh shadows and highlights.
- How: Shoot near a window or outside during the golden hours (early morning or late afternoon). Avoid direct sunlight, which can be too harsh.
- Use Reflectors:
- Why: Reflectors help to bounce light and fill in shadows.
- How: Use a white foam board or a piece of aluminum foil to reflect light onto your charcuterie board. Position the reflector opposite the light source to evenly illuminate your setup.
- Avoid Flash:
- Why: The flash can create harsh, unnatural light and shadows.
- How: Instead of using the flash, try to increase the available light by turning on nearby lamps or moving closer to a window.
Composition:
- Rule of Thirds:
- Why: This rule helps to create a balanced and engaging composition.
- How: Place key elements of your charcuterie board along the grid lines or at the intersections of the grid lines on your camera screen. For example, position the main attraction (such as a centerpiece cheese wheel) at one of the intersections.
- Leading Lines:
- Why: Leading lines guide the viewer’s eye through the photo.
- How: Use the lines of your charcuterie board or utensils to draw attention to the main focal points. Arrange elements like breadsticks or knives to create a path that leads to the center of the board.
- Negative Space:
- Why: Negative space (empty space around your subject) helps to highlight the main elements and prevent the photo from feeling cluttered.
- How: Leave some empty space around your charcuterie board to make it stand out more. This can be achieved by using a clean, uncluttered background.
Angles:
- Overhead Shots:
- Why: Overhead shots are great for showcasing the entire layout of your charcuterie board.
- How: Stand directly above your board and shoot straight down to capture all the details. Use a chair or step stool if needed to get a better angle.
- Close-Ups:
- Why: Close-up shots highlight textures and intricate details.
- How: Move closer to your charcuterie board and focus on specific elements, like a beautifully arranged section of cheese and fruit. Experiment with different focal points to capture the richness and detail of the ingredients.
- Eye-Level Shots:
- Why: Eye-level shots create a more intimate and engaging perspective.
- How: Position your camera at the same height as your charcuterie board, capturing a side view that includes different layers and textures. This angle works well for showing the height and dimension of the board.
Additional Tips:
- Use Props Wisely:
- Why: Props can add context and interest to your photos.
- How: Use complementary items like wine glasses, napkins, or flowers to enhance the scene without overpowering the main subject.
- Consistency is Key:
- Why: Consistent styling and lighting help to create a cohesive look for your photos.
- How: Develop a consistent style by using similar backgrounds, props, and lighting setups for all your photos. This helps to build a recognizable brand.
- Experiment and Have Fun:
- Why: Photography is an art, and experimenting can lead to unique and creative results.
- How: Try different angles, lighting conditions, and compositions. Don’t be afraid to take multiple shots and choose the best ones.
Let’s Capture Some Beautiful Photos!
By following these steps and tips, you’ll be able to take stunning photos of your charcuterie boards using just your smartphone. Remember, practice makes perfect, so keep experimenting with different setups, lighting, and angles to find what works best for you.